 © vxcraft.com
Job
A job object contains all references and parameters needed for the calculation of a toolpath. After successful calculation, this object contains the resulting toolpath.
Note:
The NC-Zero Point for the job is defined by the NC-Pack.
The job must be recalculated if a parameter changes or if a referenced object has changed.
Geometry references
Geometry references determine the geometry of the object to be manufactured. For a reference to be available to the job, it must be above the job in the project hierarchy.
Multiple selection is also allowed for each reference type.The following is a listing of all geometry references:
Model reference
Model references determine the shape of the object to be milled. The milling tool moves along the contour of the models.
In general, the tool paths are calculated so that the tool does not exceed the model contour. However, you can set a negative allowance and deactivate the radius compensation of the tool. In such cases, the toolpath either lies directly at the model contour or even exceeds it.
Stock reference
The stock (blank) determines the area to be machined. Toolpaths are usually generated only within the stock.
An exception are approach paths and separate settings in the job parameters, such as zone limits and allowance options. If no stock is selected, a workpiece is emulated internally in the size of the selected model references and all areas are processed. However, for some Job strategies, a workpiece reference may be mandatory. A workpiece reference is only available to the job if the object is above the job in the project hierarchy.
 © vxcraft.com
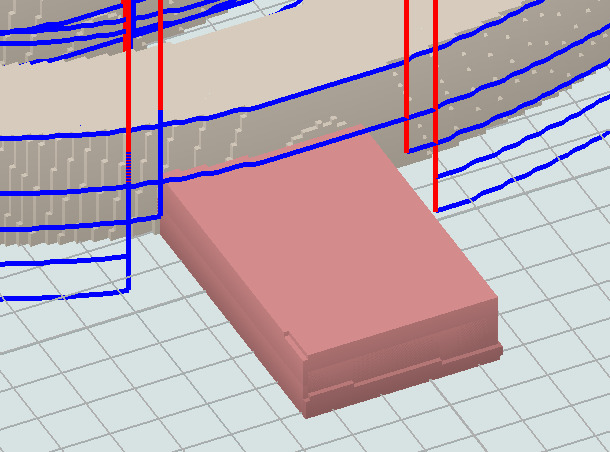
Bounding reference <PRO>
Defines areas that are excluded from processing.
Similar to the model reference, the toolpaths do not exceed this area or only according to the exceptions and rules already described in the model reference. The difference between a model reference and bounding model reference lies in the contour machining: The contour of a bounding model is not machined. If the toolpath encounters a bounding model, it ends at this point, lifts off and continues machining in the next area to be machined.
Bounding model references can be used to omit areas within a processing area, such as holding bars. A bounding model is only available to the job if the object is above the job in the project hierarchy.
 © vxcraft.com
Tool Reference
The tool reference determines the radius compensation, is used by the collision check and contains further parameters for the tool path calculation.
A tool reference is essential in most cases, because without a tool neither a radius correction nor a collision check can be performed. The tool referenced in VxCraft must match the tool actually used on the machine. Otherwise, the milling result may be falsified and there is a risk of collisions during the milling operation.
It is important that all relevant tool parameters, first and foremost the geometry definition, are correctly defined in the tool.
 © vxcraft.com
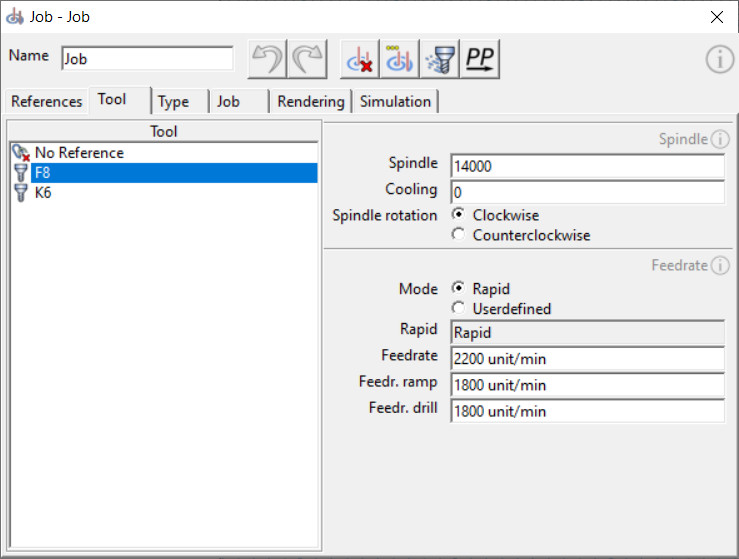
Job specific tool parameters
These parameters define the tool and spindle settings for the current job.
Any number of job objects can reference the same tool, but the job-specific tool parameters apply only to the job in question. This allows the cutting data to be optimized and individualized for each machining step.
Spindle speed [ppSpindlespeed]
This parameter defines the spindle speed.
Cooling [ppCooling]
Defines the cooling mode for processing. The value depends on the postprocessor used.
Direction of spindle rotation [ppSpindleRotation]
Determines the direction of rotation of the spindle (clockwise or counterclockwise).
Rapid traverse mode [ppFeedMode]
Controls the feed rate for rapid traverse movements. The rapid can be controlled either by the CNC control (Rapid) or by an optional value input (User defined) in the job.
Feed rate rapid [ppFeedRapid]
Optional feed rate for positioning movements in unit/min. Only active if rapid traverse mode is set to "User defined".
Feed rate [ppFeed]
The feed rate for cutting movements in unit/min.
Feed rate ramp [ppFeedRamp]
The feed rate for ramped plunge movements into the material in unit/min.
Drill feed [ppFeedDrill]
The feed rate for vertical plunge movements into the material in unit/min.
Type [ppJobtype]
Selecting the Job strategie determines the basic calculation algorithm for the toolpath.
Roughing [ppJobtype=0]
Clears the 3D model from the stock layer by layer.
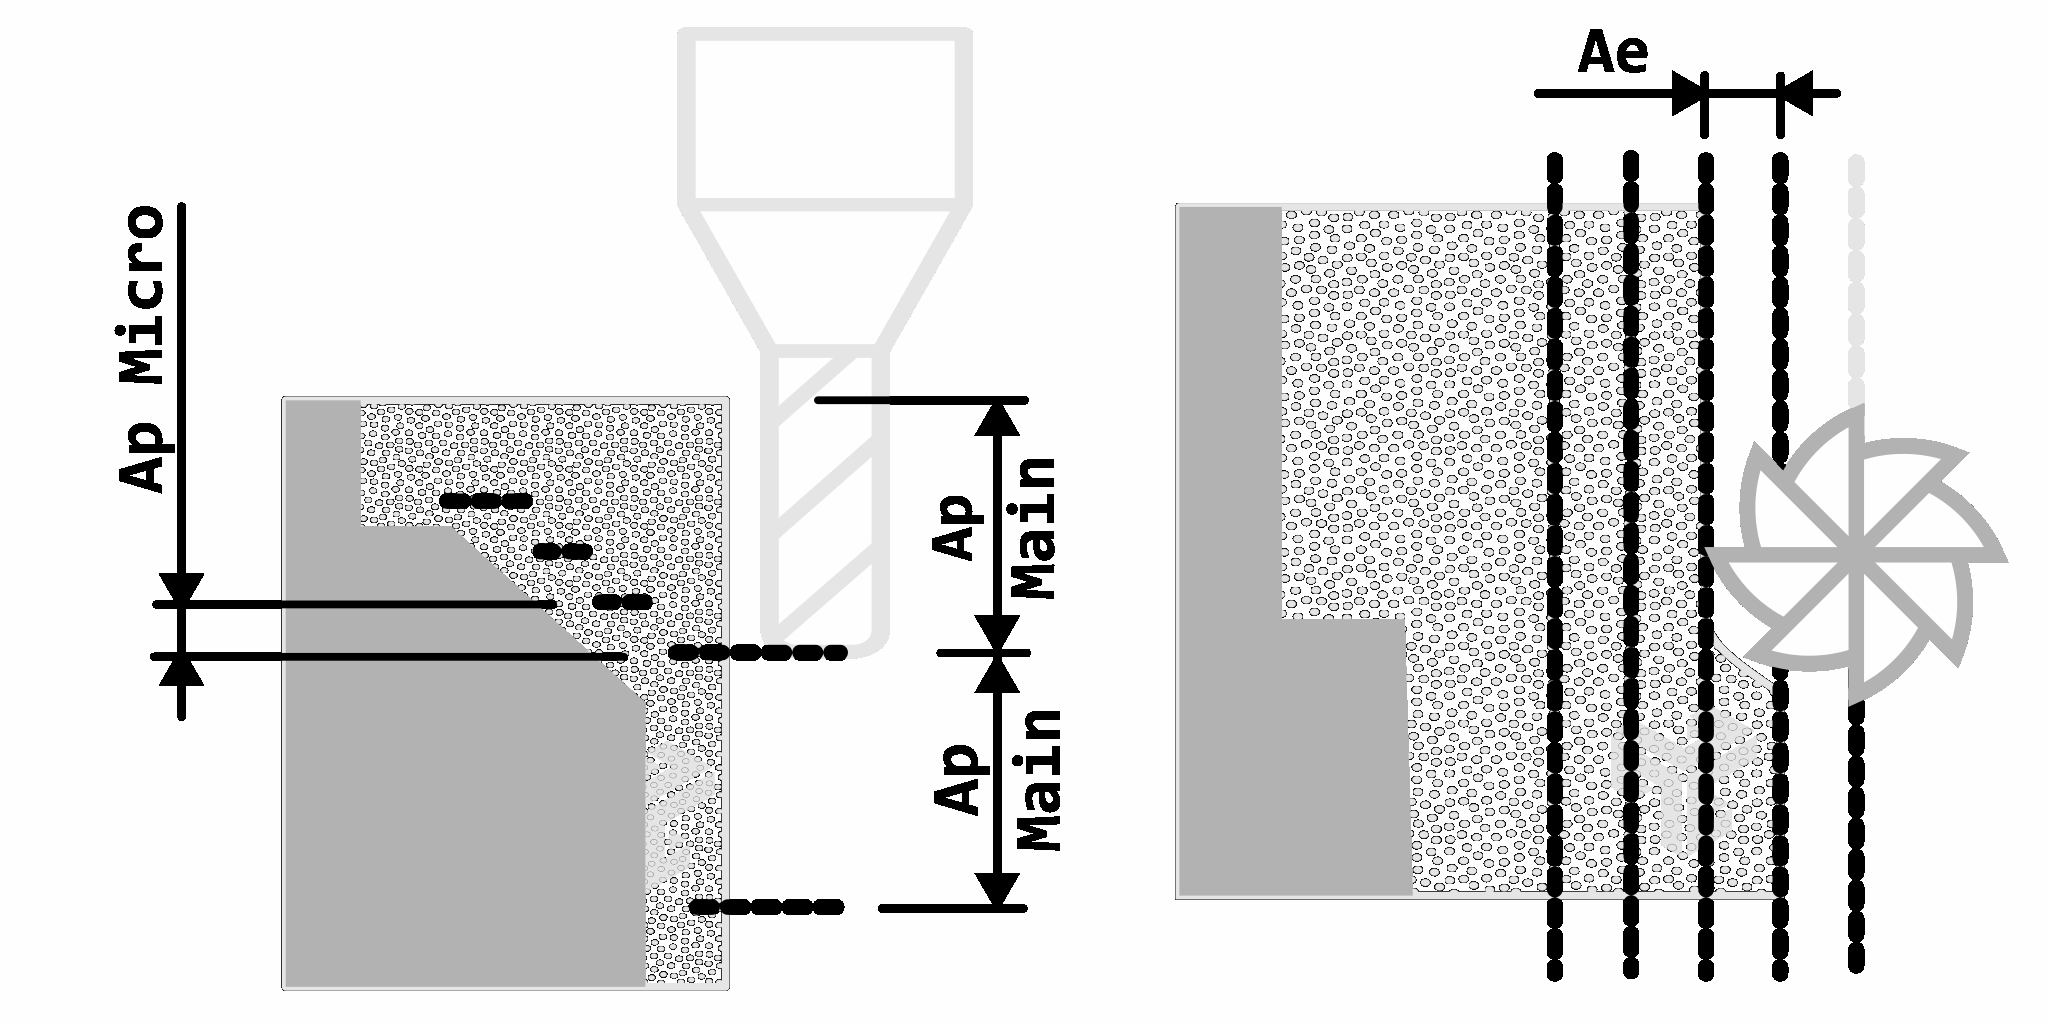
This algorithm creates planar tool paths on each infeed plane for broaching the stock. Between the start and floor planes, planes are created and broached at the distance of the main infeed (Ap Main). After each main infeed, the residual material is optionally broached layer by layer from bottom to top with a finer layer gradation (Ap Micro). As a result, the 3D model is machined out very quickly and thoroughly during roughing.
Contour [ppJobtype=1]
The contour milling algorithm creates plane-by-plane, planar toolpaths around the 3D model. With a low, vertical cutting depth (Ap Main), this Job strategie is also suitable for finishing steep and vertical areas.3xShape <PRO> [ppJobtype=2]
With the "3xShape" finishing algorithm, flat areas can be three-dimensionally mapped. The spiral cutting depth reduces approach and departure movements to a minimum.Engrave [ppJobtype=3]
The engrave algorithm is optimized for fine structures that are "embossed" in one plane.
The structures are machined out in a spiral using three-dimensional tool paths. The vertical cutting depth adapts to the model. If the depth of the structure exceeds the main vertical infeed, the plane is completely cleared after each main vertical infeed before machining is continued in depth.
Drill <PRO> [ppJobtype=4]
The "Drill" Job strategie is a semi-automatic cycle for calculating drilling movements.
Parameter
In the "Parameters" tab, the settings for the selected Job strategie can be adjusted. This section varies greatly between Job strategies, as not all parameters are relevant or available for every Job strategie.
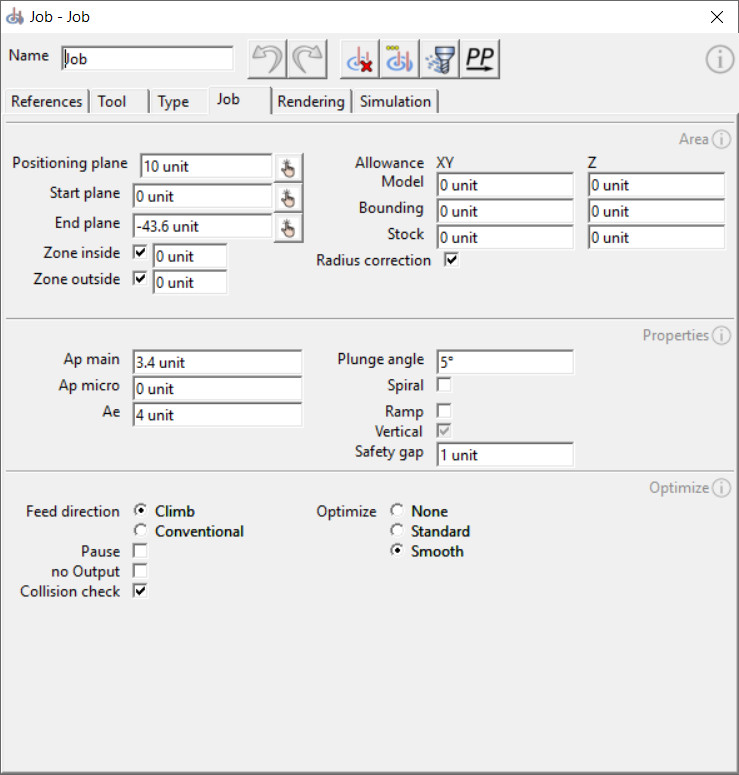
Parameters - Milling area
In this section, the milling area to be calculated is defined and settings for the geometry references are made.
Vertical milling area
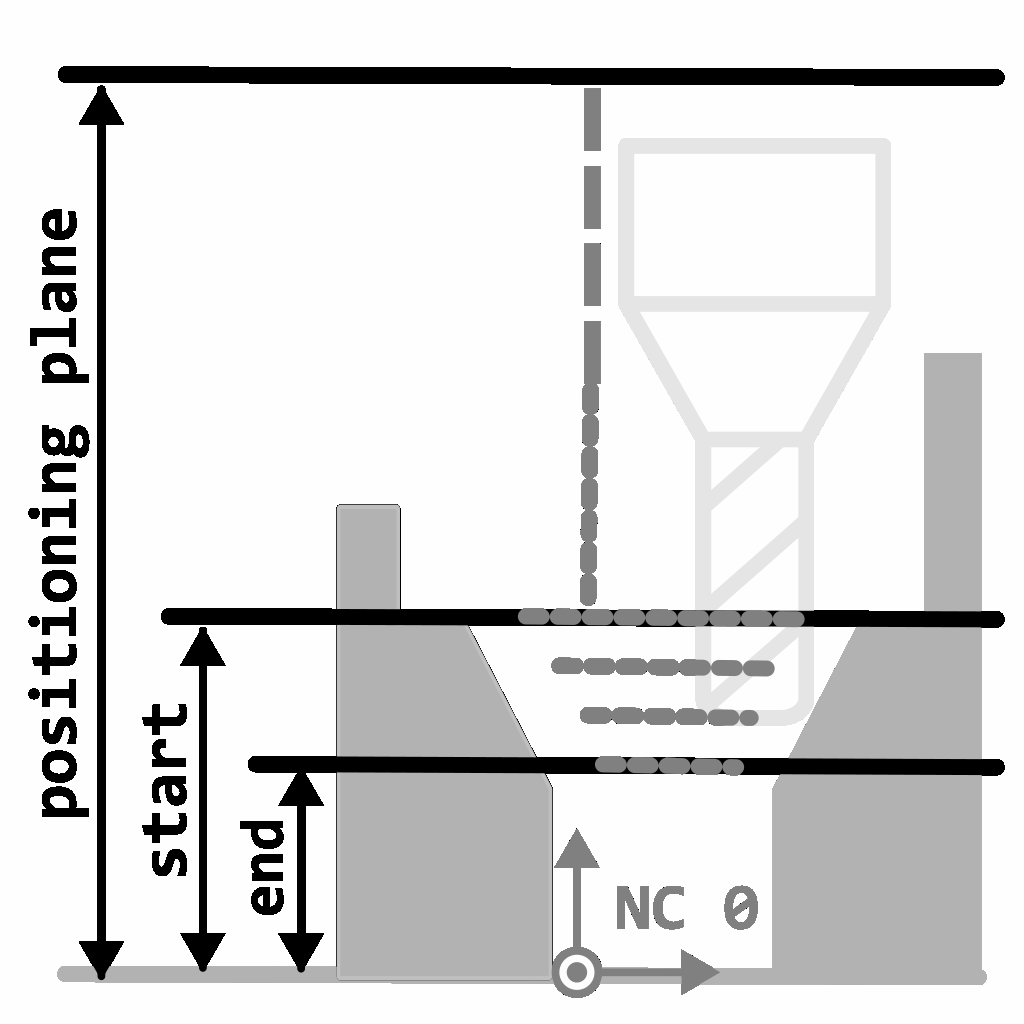
The following levels limit the vertical milling area and determine the positioning plane for the job.
 © vxcraft.com
Positioning level [ppPlaneSite]
The positioning plane defines the height of the plane relative to the NC-Zero Point. To avoid collisions, this plane must be higher than the geometry references. At the height of the positioning plane, the tool usually moves to the various machining positions at rapid speed. Whether this plane is approached before start positioning and after a tool change depends on the postprocessor.Start plane (top machining plane) [ppPlaneStart]
The start plane determines the height of the plane where machining starts, relative to the NC-Zero Point. This plane limits the vertical milling area upwards. The milling paths are generated from this plane. Plunge movements, which can also start above, are an exception.End plane (lowest working plane) [ppPlaneEnd]
The end plane sets the height of the plane where machining ends, relative to the NC-Zero Point.
This plane limits the vertical milling area downwards. The milling paths are generated up to this plane.
Zone limitation
The milling area can be restricted by zone settings in addition to the selected geometry references.
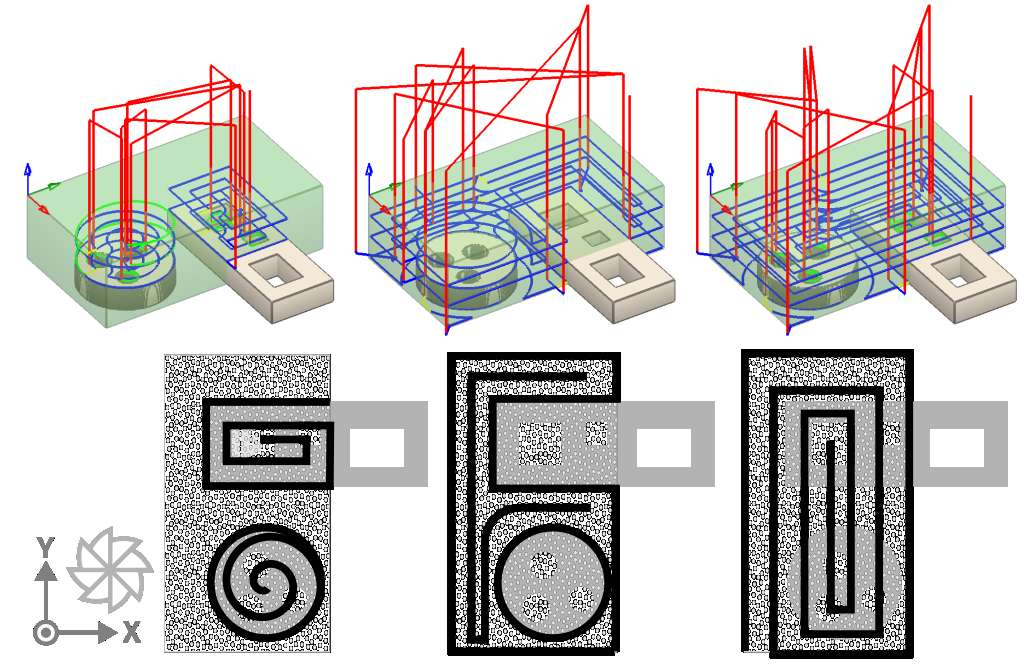
Zone inside/outside <PRO>
The zone boundary runs along the outermost silhouette of the model references. Optionally, the zone can be extended or reduced with an offset. Zone limitation can be very useful when using holding bars and can even reduce the number of necessary geometry references.
 © vxcraft.com
Zone Inside | Zone Outside | Both zones
Zone stock: activated
Zone inside <PRO> [ppAreaIn]
Toolpaths are created within the outermost model silhouette. By specifying an offset, the zone can be extended or reduced. Islands and holes in the geometry references are not affected and will be processed.Zone outside <PRO> [ppAreaOut]
Toolpaths are created outside the outermost model silhouette. The zone can be extended or reduced by specifying an offset.
Zone stock <PRO> [ppAreaStk]
Tool paths are bounded to the area of the stock. This option is available for Job strategies where it is not common to limit the toolpath to the stock only.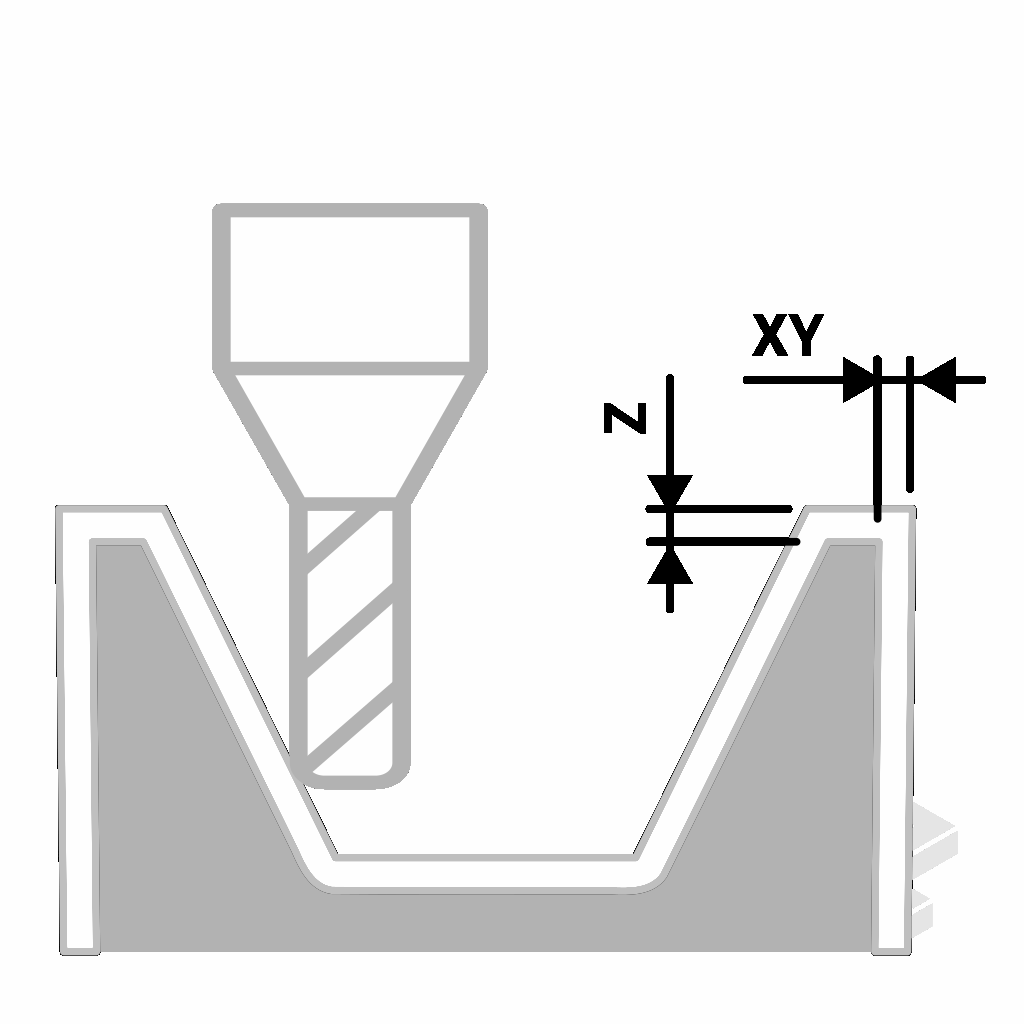 © vxcraft.com
Geometry allowance <PRO> [ppAll...]
In the allowance table, a material allowance can be specified in the horizontal axis of the NC-Zero Point (XY) as well as the vertical axis (Z) for each geometry reference. Negative values are also possible.
 © vxcraft.com
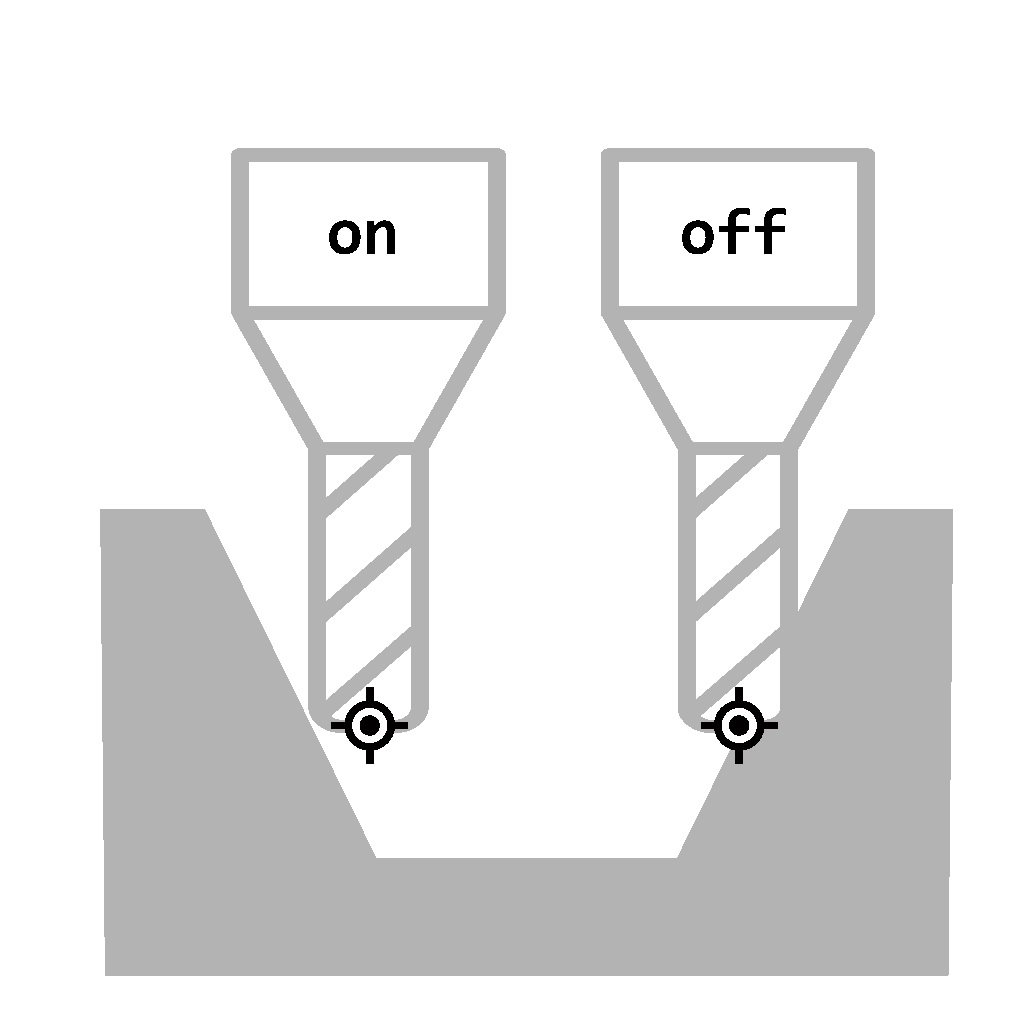
3D Radius correction [ppRadcorr]
The radius correction takes the tool geometry into account when calculating the tool paths and enables a collision check to be performed.
With radius compensation activated, the collision check is applied and the tool path is calculated so that the tool geometry does not penetrate the model contour, or only according to the tolerance and geometry allowance.
If the radius compensation is not activated, the toolpaths are applied directly to the model geometry. In this situation, the inserted (unknown) tool would enter the model geometry up to half of the diameter or up to the tool axis. A collision check is not possible in this case.
Parameters - properties
The algorithm of the selected Job strategie is controlled in the job properties.Among other things, the cutting depth, approach and departure movements, plunging behavior and Job strategie-specific properties are configured here. This area varies greatly between the different Job strategies.
Cutting depth
 © vxcraft.com
Vertical main cutting depth [ppApMain]
Starting from the start plane (uppermost machining plane), the main cutting depth is fed in the direction of the Z axis until the end plane (lowermost machining plane) is reached.
Vertical cutting depth of the intermediate steps <PRO> [ppApMicro]
The material that cannot be reached by the main cutting depth is worked out in the distance of the intermediate steps.
The main cutting depth does the roughing work, while the intermediate steps clean the 3D contour by a finer gradation. The value is optional and must be smaller than the main infeed.
Horizontal cutting depth [ppAe]
Specifies the preferred horizontal spacing of the milling paths.Regardless of this value, cuts with higher distances or even cuts into the full material can also occur in the calculated toolpath due to the geometry. The wrap angle (pressure angle) of the milling cutter can therefore be larger than would be expected from the specified value.
 © vxcraft.com
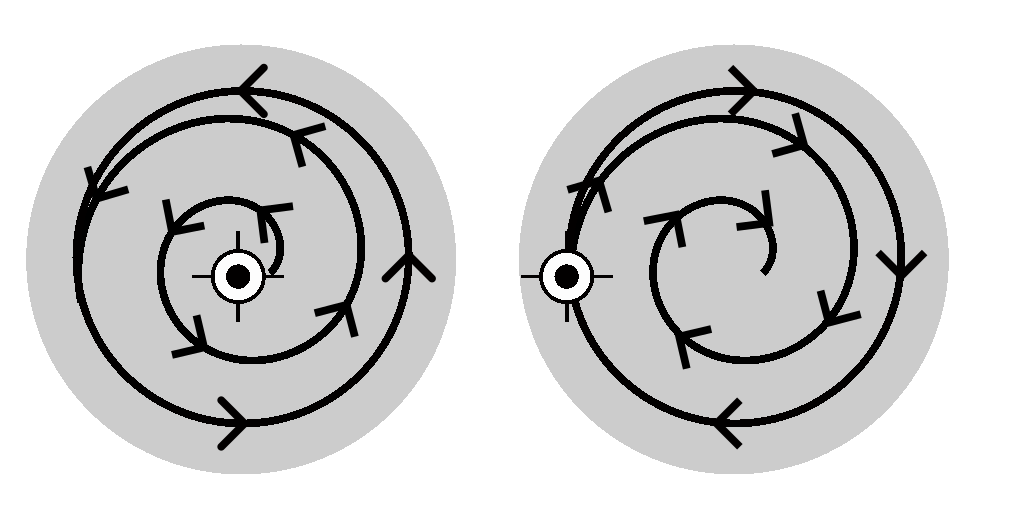
in climb.
Direction
Start
Defines the starting point of the milling path.
Center
The milling path starts in the center and ends at the edge of the area to be machined.
Outside
The milling path starts at the edge of the area to be machined and ends in the center.
Plunge / lateral approach
In order to reach the actual starting point of the milling operation, an attempt is made, if possible, to avoid plunge movements and instead to prefer lateral approach movements. In a lateral approach, the tool is positioned either on an area that has already been machined or laterally outside the stock, and from there it advances horizontally to the starting point of the actual milling operation.
If a lateral approach is not possible, plunge movements in the direction of the Z axis are used according to a priority sequence. The sequence from high to low is: spiral plunge, ramp plunge and finally vertical plunge.
The available plunge variants depend on the selected Job strategie, and the individual plunge options can be activated or deactivated as required.
 © vxcraft.com
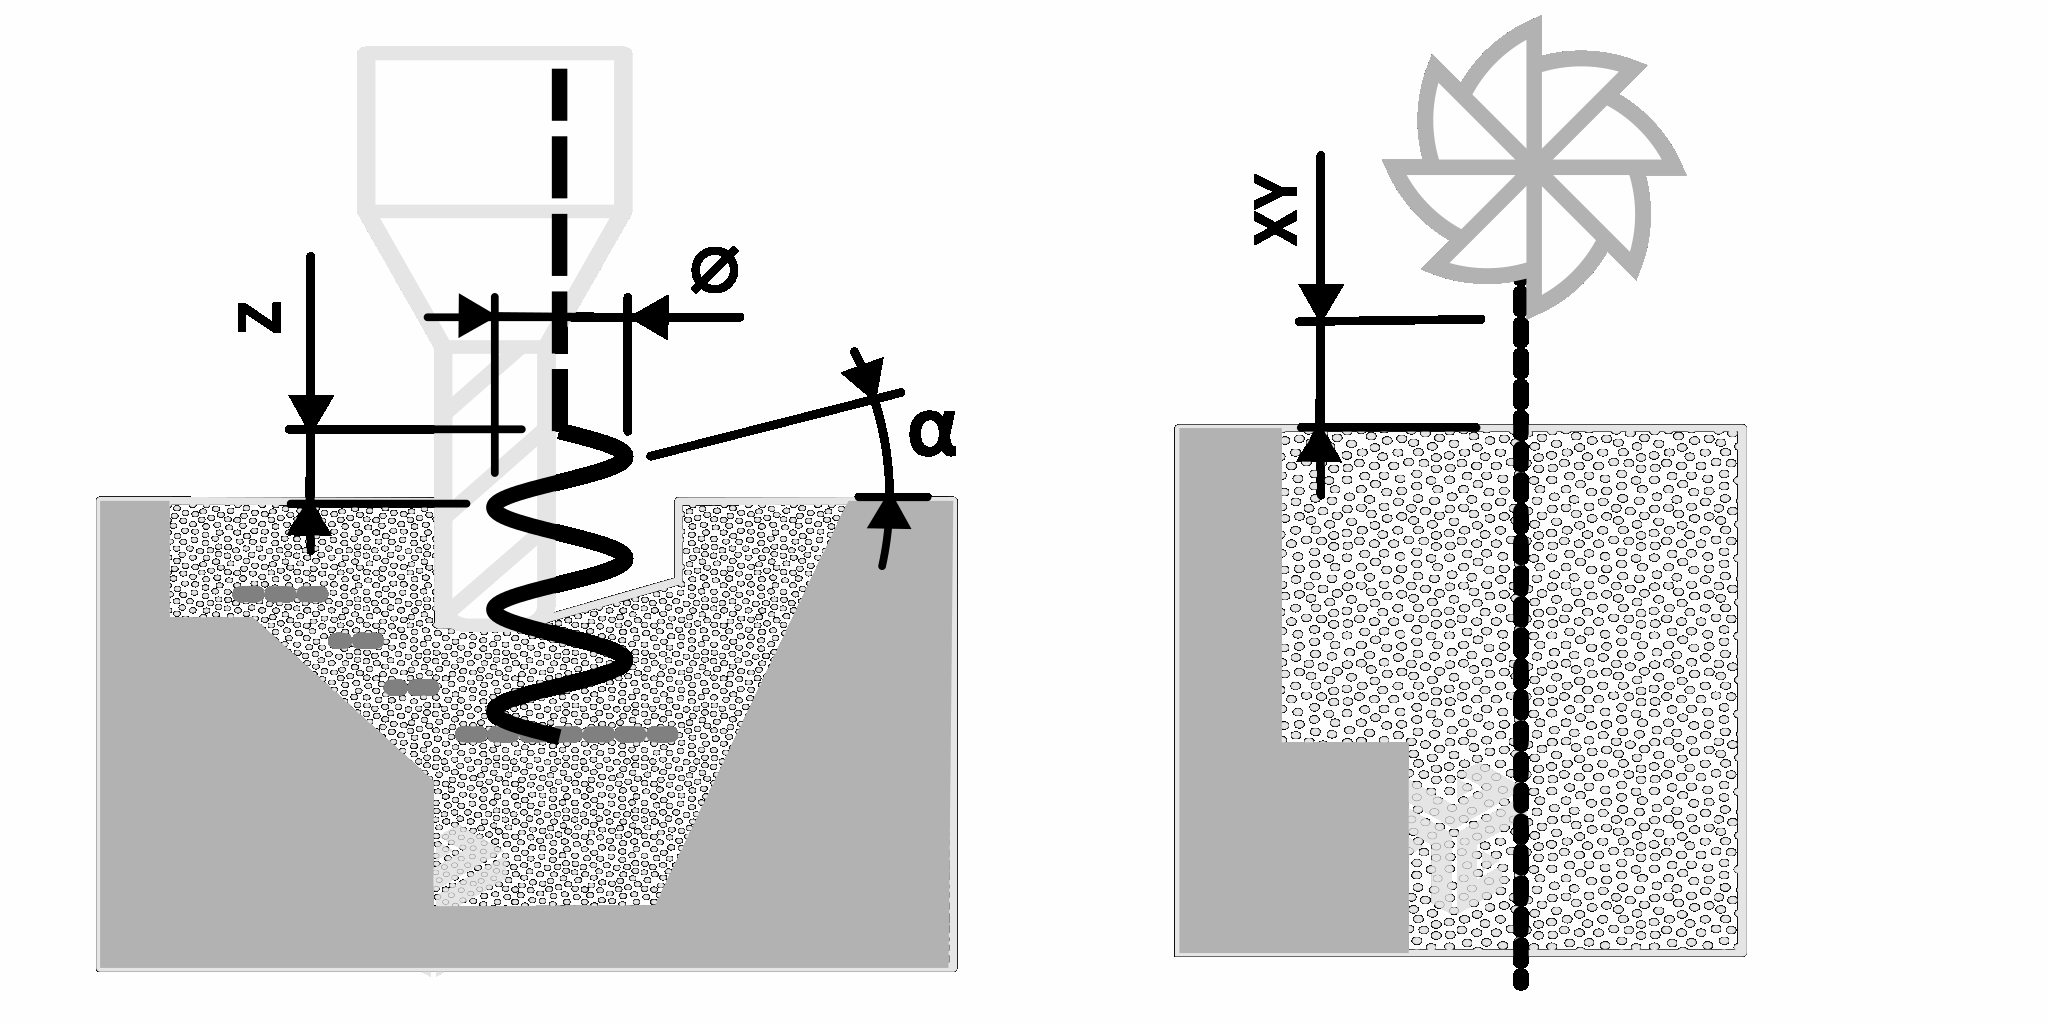
Plunge angle α [ppPlungeAngle]
Specifies the angle for spiral and ramp plunge movements.
Spiral plunge <PRO> [ppPlungeSpiral]
The tool plunges into the stock in a spiral from the stock surface to the working plane.
The dimension of the spiral is determined by specifying the diameter [ppPlungeDia] and the plunge angle, while the height is calculated from the working plane, the workpiece surface and the safety clearance in the Z axis.
Ramp plunge <PRO> [ppPlungeRamp]
The tool plunges into the stock in a ramp-like manner.
The starting height of the ramp is calculated from the machining plane, the workpiece surface and the safety clearance. In the XY direction, the path of the ramp runs along the toolpath immediately following the working plane. If a longer path is required for the ramp than is available, the path repeats itself in a pendulum shape until the machining plane is reached.
Vertical plunge [ppPlungeDrill]
The approach movement is vertical through the stock, using the drill feed.
Vertical plunge has the lowest priority and is only used if none of the other plunge variants are possible or if they are deactivated.
Safety distance [ppSgap]
The safety clearance defines the minimum distance in all three axis directions (X, Y and Z) between the tool and the geometry references for positioning movements in rapid.
In rapid traverse, the tool approaches the geometry up to the set-up clearance. Ramped plunge movements are extended up to this distance.
Tip:
A large value for the safety distance significantly influences the processing and calculation time and also extends the milling time due to longer plunge paths. The value should be selected in such a way that safe milling is ensured, taking into account all tolerances and deviations, without being unnecessarily large.
Parameter - optimization
Preferred running direction [ppFeedDir]
The preferred running direction determines the direction of movement of the tool in relation to the model contour.
It should be selected taking into account various factors, such as material, machine, cutting tool and its tool life, desired surface finish, accuracy and infeed strategy. A detailed description of all influencing factors would go beyond the scope of this manual. For some applications, such as a full cut, this parameter does not play a role.
As already mentioned in the heading, this parameter is the preferred running direction. This means that an attempt is made to use the running direction set here. However, depending on the geometry and other job parameters, this may change several times in the resulting toolpaths.
 © vxcraft.com
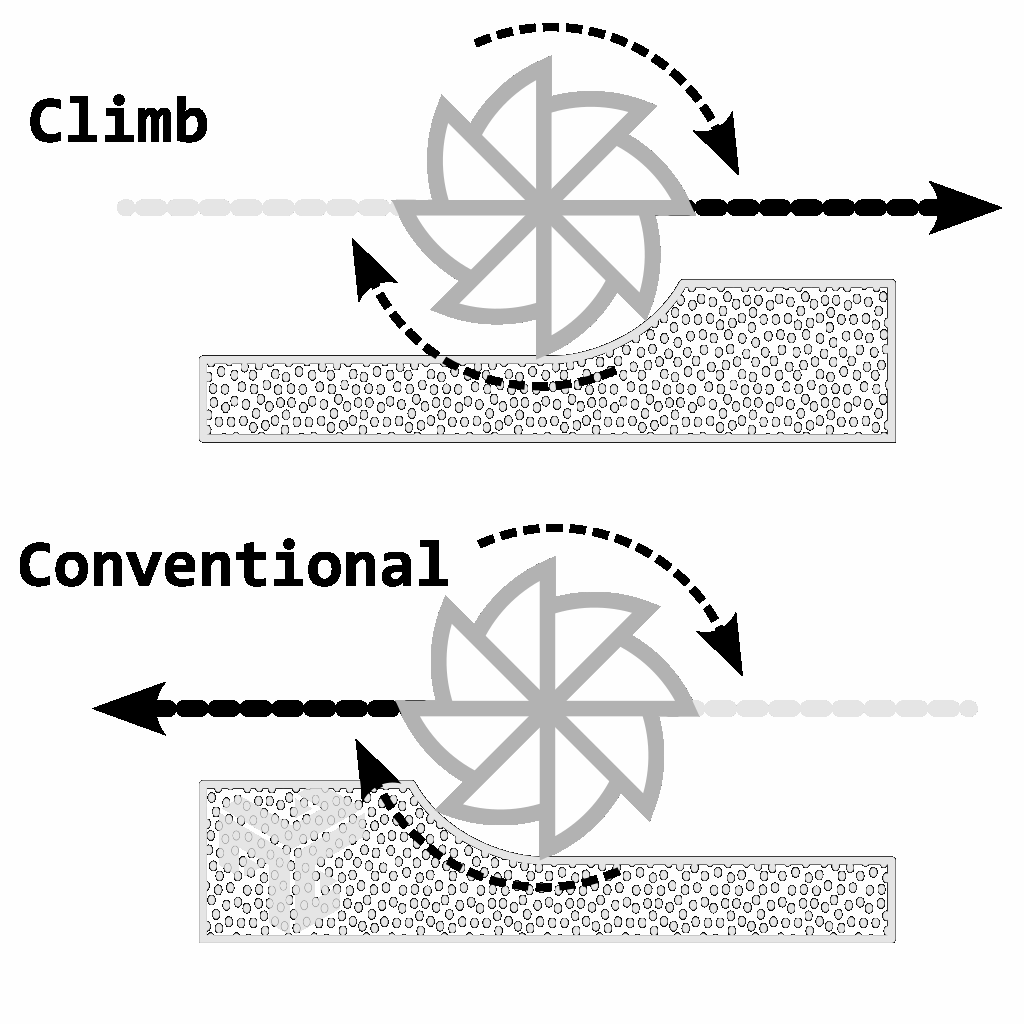
Climb [ppFeedDir=0]
In climb milling, the tool works its way forward in the feed direction.
The cutting edges of the tool hit the material abruptly, whereby the chip thickness is maximum at the beginning and decreases steadily until the cutting edges exit. In practice, the climb is usually selected for CNC milling nowadays, provided that the guide clearance of the machine allows it. This method generally causes less vibration and less tool wear and usually produces a better surface quality on the stock.
Conventional [ppFeedDir=1]
In conventional milling, the tool moves in the opposite direction to its direction of rotation.
The chip forms away from zero as the cutting edge enters, towards the maximum chip thickness as the cutting edge exits. The conventional can be advantageous when machining harder material or roughing, as it allows a higher metal removal rate and improves chip formation. However, the conventional can lead to increased tool wear and vibration, possibly affecting surface quality and tool life.
Pause [ppPause]
Inserts a pause command into the NC program.
The position at which the pause is actually set depends on the postprocessor. Usually this is done after the tool change, before the approach of the first position and before the start of the spindle.
No NC output
If this parameter is enabled, the job will not be forwarded to the postprocessor.
Dhis can be useful, for example, if an object that has already been milled is to be reproduced as a virtual blank for further machining.
Collision check
If the check box is activated, a collision check is performed for the calculated toolpath.Attention: A deactivated collision check can represent a risk for the machine and safety!
For more information, see the subchapter "Collision report".
Path optimization [ppOpt]
By selecting a path optimization, the calculated milling path is subsequently improved.
No path optimization [ppOpt=0]
The calculated raw path is not optimized. The generated path provides the highest possible precision, but results in very fine staircase-like movements. This mode can be useful if the CNC machine control is to smooth the path.Standard [ppOpt=1]
Staircase-like movements are reduced by smoothing the calculated raw path. Due to a low tolerance, the details of the model are preserved as far as possible.
This option ensures an optimal balance between precision and machine performance.
Smooth [ppOpt=2]
The calculated raw path is generously smoothed and rounded. This results in very smooth tool movements that are gentle on the material and allow the use of high feed rates.
However, since the tolerance is higher in this case, the toolpath can deviate further from the original geometry, which can result in the smallest details being affected.
 © vxcraft.com
Parameter - drill
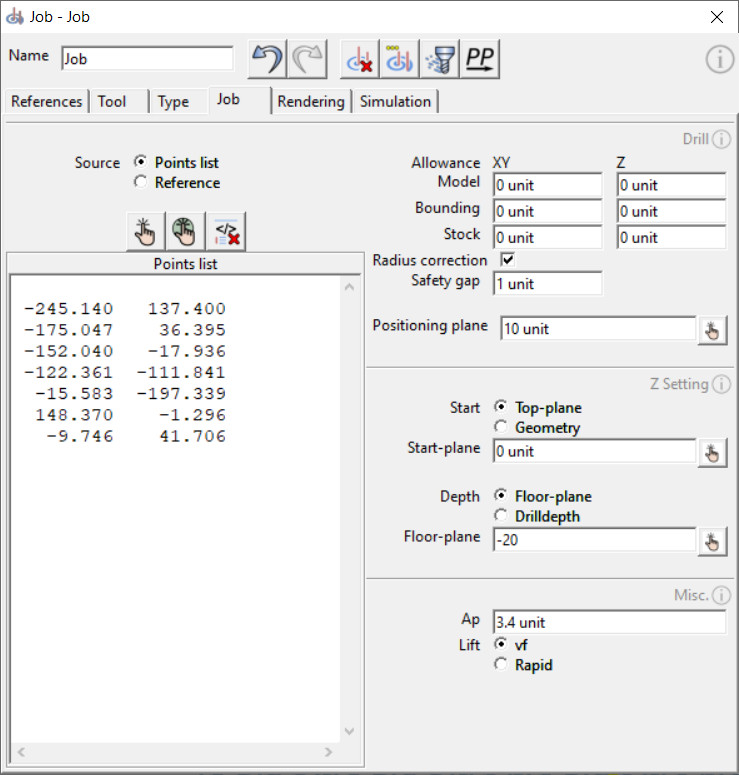
The "Drill" Job strategie is a semi-automatic cycle for calculating drilling movements.
Drilling positions can either be entered manually in a list or selected directly on the 3D model using various selection tools and transferred to the list. Alternatively, it is possible to transfer the drilling positions from another job.
Note
As long as the job dialog is open, a preview of the drilling positions is displayed in the render window. This preview shows lines representing the drilling axes to give you a visual orientation of the planned drillings.Precision
The values of the point list are transferred to the voxel grid during the calculation. As a result, the coordinates of the points in the output NC file may deviate from the coordinates entered in the point list. The accuracy of the drilling positions is determined by the project resolution.
Source
Specifies the source from which the drill positions are obtained.
Points list
The points list contains the XY coordinates of the drilling positions, starting from the NC-Zero Point. Each line of the list defines a drilling position and consists of two values (position X and Y).
As soon as the input focus leaves the text field or the F5 key is pressed, the list is automatically formatted, cleaned up and checked for errors. The drilling axes displayed in the render window are also updated.
Set drilling position
With this function, drill positions can be selected directly in the render window by mouse click. The selection mode can be terminated by right-clicking in the render window and calling up the context menu or by pressing the "Esc" key. The set points are added to the points list.Set and center drill position
This function allows setting drill positions in the center of automatically detected shapes in the render window. The selection mode can be terminated by right-clicking in the render window and calling up the context menu or by pressing the "Esc" key.
To successfully select a shape, left-click the side face of the desired shape (e.g. the vertical inside of a hole). The shape must not intersect the model boundary.
Delete points list
This function removes all entered points in the text field.
Reference
The drill positions are taken from the selected reference.
If the drill positions of the reference change, they are automatically updated when the job is recalculated. Any job of the type "Drill" is allowed as a reference and must be located above the job in the project hierarchy.
Z Setting
In this section, the automatic detection of the drilling start points and the drilling depths are configured.
Start [ppDrillTop]
Defines the mode how the drilling start points are determined.
| Mode | Comment |
|---|---|
| Start plane | All holes start on a plane. The specified value determines the height of the plane starting from the NC-Zero Point. |
| Geometrie | The starting point in direction Z of all holes is determined automatically. The surface of the geometry references, as well as the tool and the radius compensation are taken into account. An optional offset shifts the starting points by the specified value. |
Depth [ppDrillFloor]
Defines the mode in which the drilling depths are determined.
| Mode | Comment |
|---|---|
| Plane | All drill holes end on a plane. The specified value determines the height of the plane starting from the NC-Zero Point. |
| Drilling depth | All drill holes are the same depth. The depth results from the starting point and the specified value. A negative value must be specified. |
Miscellaneous parameters
This section contains additional settings for drilling.
Vertical cutting depth [ppApMain]
After the tool reaches the specified vertical cutting depth, it performs a retraction movement to break the chip. It prevents chip jam by lifting out of the hole and repositioning itself in the hole. This process is repeated until the drilling depth is reached.
Lift
Defines the feed mode with which the tool lifts out of the hole after each cutting depth and repositions itself in the hole in the case of multiple infeeds.
Resulting stock
After successful calculation of the job, a resulting stock is added to the job as a subelement. This can be reused as a continuation blank for the next job.
The resulting stock is calculated from the referenced stock, the tool and the toolpaths. It is automatically deleted as soon as the job is recalculated or reset.
Collision report [ppCollision]
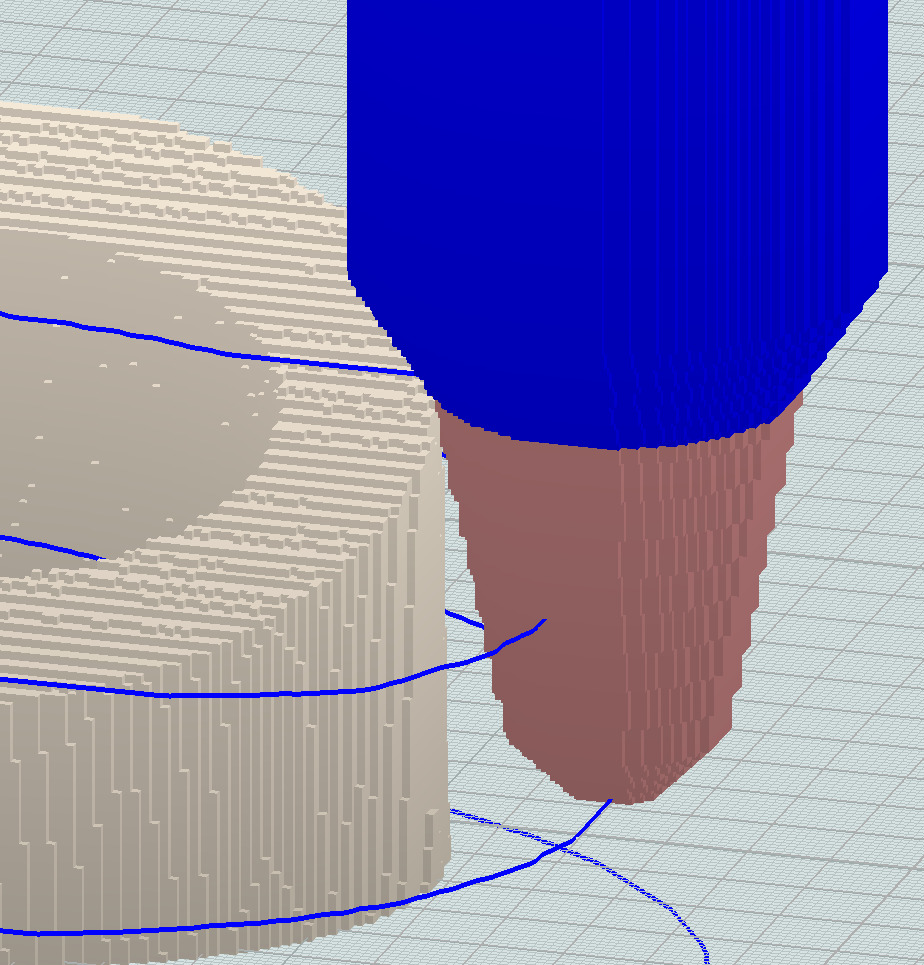
During the calculation of a job, a collision between the tool and the stock can be detected. In such a case, the system creates an object called "*_COLLISION" as a sub-element to the job. This object shows the contact points of the non-cutting tool geometry with the workpiece and is automatically inserted together with the resulting stock. If the job is recalculated or reset, the collision object is automatically deleted.
For a collision check to be performed, the following conditions must be met:
- The collision check must be activated in the job.
- A tool must be referenced in the job.
- A stock must be referenced in the job.
A collision is detected when the tool makes contact with the stock during rapid traverse or when the non-cutting geometry of the tool makes contact with the stock.
